

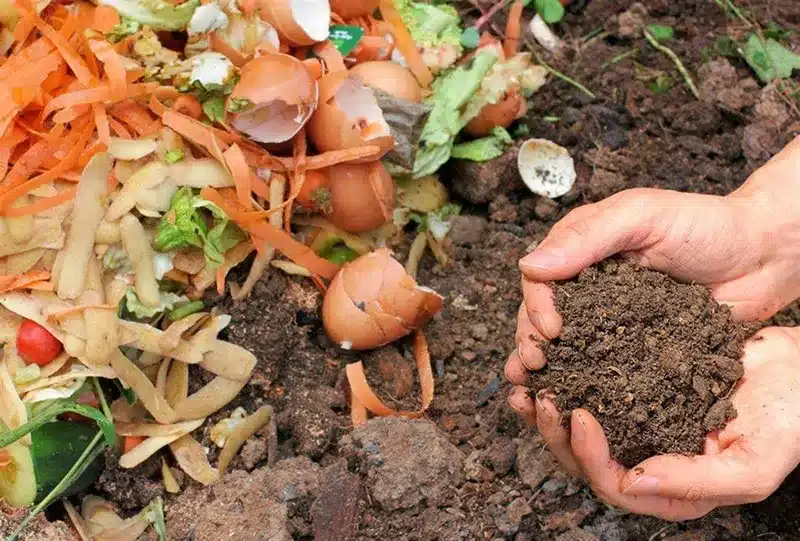
Worm farming is the best way for you to convert kitchen waste or food scraps into usable garden fertilizers. It is easy to start and maintain. In fact, even with just a small space at home, you can start your very own worm farm.
Worm farms make use of earthworms to convert organic matter into worm castings and liquid worm wee which can be used as fertilizers. It’s a practical and convenient way to make all-natural fertilizer right at your home.
The great thing about worm farming is that it requires little effort and time to make the worm farm thrive. If you want to know how does worm farming work and how you can get started, then this guide is what you are looking for.
Quick Navigation
- What Is Worm Farming?
- Basic Worm Farm Design
- How Does Worm Farming Work? The Basic Set Up
- Can You Build a BathTub as a Worm Farm?
- What Can You Feed to the Worms?
- Things You Can and Can’t Put in a Worm Farm
- What Is a Worm Farm Leachate?
- How Do You Collect and Use Worm Farm Leachate?
- What Are Worm Castings?
- What Are the Techniques to Separate Worms From Worm Castings
- How Do You Use Worm Castings?
- What Are the Common Worm Farming Problems and How to Avoid Them?
- Summing it All Up!
What Is Worm Farming?
Worming farming, also known as vermiculture or vermicomposting systems, is a sustainable planting practice. It is the process of disposing food waste or other organic waste using worms to produce liquid fertilizer that is beneficial for your garden.
Worm farms, as the name implies, make use of earthworms. They are responsible for breaking down food scraps and organic waste and converting them into worm castings and worm casting leachate or the liquid worm wee.
In worm farming, the earthworms are called compost worms. Unlike regular garden earthworms, compost worms are surface feeders that don’t need to burrow deep into the soil.
There are three breeds of compost worms that are perfect for your worm farm: the Tigers, Blues, and Reds. The great thing about these breeds is the fact that they eat the same quantity as their body weight on a daily basis. Garden worms don’t have this eating capacity. Thus, the worms work slower.
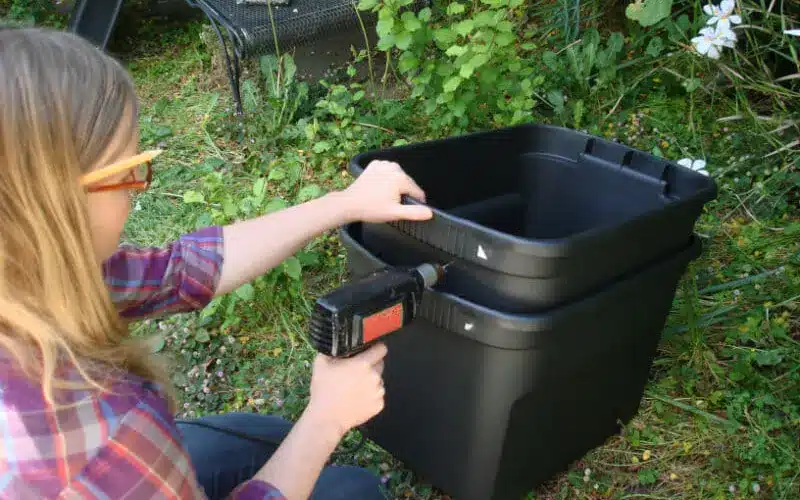
A worm farm is perfect for small households because it does not require a large space. Worm farms can be built or bought depending on your space conditions. Most household worm farms are stacked in trays that don’t consume a lot of space.
Though, if space is not an issue in your household and you want to be able to process more food scraps and organic waste, you can build a large worm farm or work farm.
If you have old commercial bins with wheels or an old bathtub, you can use these as your worm farm. Aside from big households, a large worm farm is advisable for school cafeterias, restaurants, and workplaces that generate a ton of food waste.
Basic Worm Farm Design
As mentioned earlier, a typical household worm farm is stacked in trays. The topmost tray is where you put the compost worms and food scraps. It has small holes on top of the tray to make room for the compost worms to breathe.
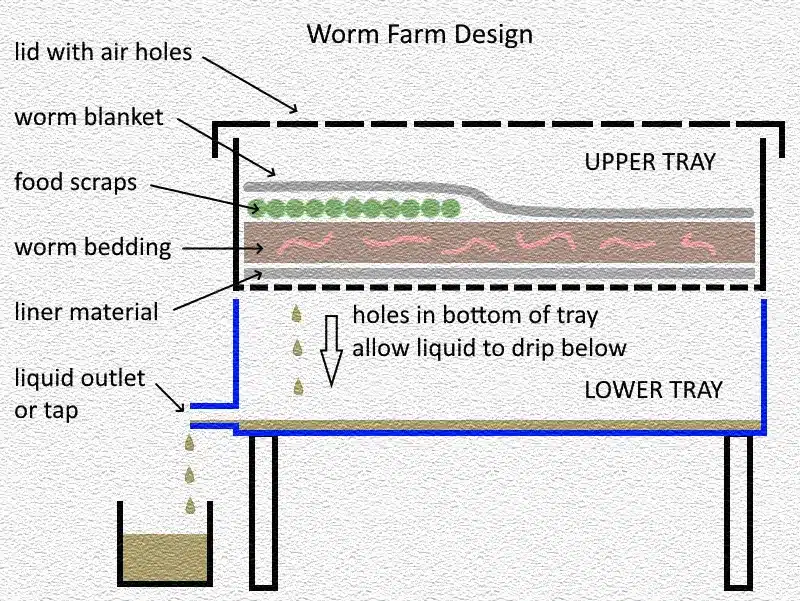
The bottom layer collects the dripping liquid from the top tray. There is a faucet on one side of the container at the bottom layer where you can collect your liquid fertilizer. Ideally, you can start with just two trays of worm farm.
Over time, however, you may notice that your food waste is growing and you would be needing another worm farm tray. If this happens, just fill the new tray with kitchen scraps and the compost worms will find their way to it.
When all your compost worms are busy at work in the new tray, you can remove the bottom trays that are full of worm casting and use it for your garden.
Parts of the Worm Farm
A common household worm farm design has four basic parts:
Liner
To ensure that the compost worms don’t fall and drown into the bottom tray, a liner should be placed at the bottom of the top tray. Shade cloth with a newspaper or cardboard placed over it can serve as a liner for your household worm farm.
Worm Bedding
Your worm farmers need a place to rest and a place where they can live. The worm bedding should be a damp layer. The moist bedding is usually made of organic material that consists of coconut coir, shredded paper or shredded newspaper, and manure or well-aged compost.
Food Scraps
These are basically kitchen scraps or organic matter which your compost worms can eat.
Cover
The cover is also called a worm blanket. The cover is basically a whole newspaper or an old hessian sack that is placed over the worm bedding and their food. The cover helps make the worm farm look dark, and feel cool.
The cover allows the worm’s habitat to be moist and encourages the worms to look for food and eat it. The cover is biodegradable which means it will eventually break down in a couple of weeks. You would need to stock up on old newspapers or old hessian sacks.
How Does Worm Farming Work? The Basic Set Up
To make a worm farm work, you need to take into consideration three things:
- The available space that you have in your household
- The volume of food waste that your household can produce
- The right spot to set up your worm farm
In choosing the right location for your worm farm, you have to keep in mind that the worms thrive in cool environments. They should not be exposed to direct sunlight. A shady spot in your backyard like under a tree or inside your shed would be a perfect place to settle your farm.
First, you can start with just one small worm farm. You can gradually increase your worm farm if you are producing more food waste or food scraps and if the space permits. Before you know it, you already have a growing and working worm farm.
Steps in Setting Up Your Worm Farm
You can build your own worm farm or assemble a purchased worm farm. Most worm farms that you can buy come with construction instructions.
Here’s how to set up one:
- In the top tray place a liner of about ¼” of newspaper or cardboard.
- Worm bedding: you can prepare the bedding by soaking shredded newspaper or coconut coir in water to make it damp. Also, you may place manure into the tap layer above the liner.
- Place the worm blanket over your worm bedding
- Add 500-1,000 compost worms to your bedding.
- Don’t rush feeding your worms just yet. Let the worms settle into their new worm farm environment for a couple of days.
- Afterwhich, you may begin giving them food lightly and gradually.
Can You Build a BathTub as a Worm Farm?
Yes, an old bathtub can be used as a worm farm. Generally, a bathtub can hold approximately 200L. This can hold a large number of compost worms. The difference between using an old bathtub rather than a worm farm with trays is the fact that you are working on a single layer only.
In setting up your bathtub, you need to support it with bricks or a wooden stand to elevate it from the ground. The drain hole needs to be covered with a screen or mesh to ensure that only the liquid will come out. You may place a container or small bucket underneath to collect the draining liquid.
The design of a bathtub worm farm is as follows:
- The bottom layer is full of coarse gravel ideally for drainage purposes.
- The gravel is covered with a shade cloth liner.
- Worm bedding
- Food waste
- Worm blanket or cover (top layer)
- You may use a timber sheet or a wooden cover fitted to the bathtub’s size to cover the whole bathtub and protect all the worms.
What Can You Feed to the Worms?
Not everything can be placed inside your worm farm for the worms to eat. There are certain matters that are considered unhygienic to even be placed inside a worm farm.
For example, you should avoid placing wood garden prunings or green waste into your worm farm. These are better placed in a regular compost bin.
Compost worms can breed on their own. You will notice over time that your worm population has increased. When worms are breeding, they tend to eat more food. Compost worms know how to self-regulate to complement the size of the worm farm and the food provided.
Feeding your Worms
Knowing what to feed your worms is important. It is also equally important to know how to properly feed them as well. You have to remember to give your compost worms some time to adjust to their new environment. Don’t expect them to work much during the initial few weeks.
You should give the worms a small amount of food on their first day. Giving them too much food will lead to uneaten food which will eventually rot. Rotten food will make your worm farm an unhealthy environment for your worms.
When placing food on the worm farm, don’t spread it all over. Instead, just add food to one corner of the container. Doing this gives the worms room to breathe. They can go to the space where there is no food if they don’t like what food scraps you placed.
You don’t have to stick to one side of the container when placing their food. You can choose a different spot each time. Just make sure that there is a side in the container where the worms can go when they don’t feel like eating.
Things You Can and Can’t Put in a Worm Farm
Here is a list of the things you can put and cannot put inside your worm farm:
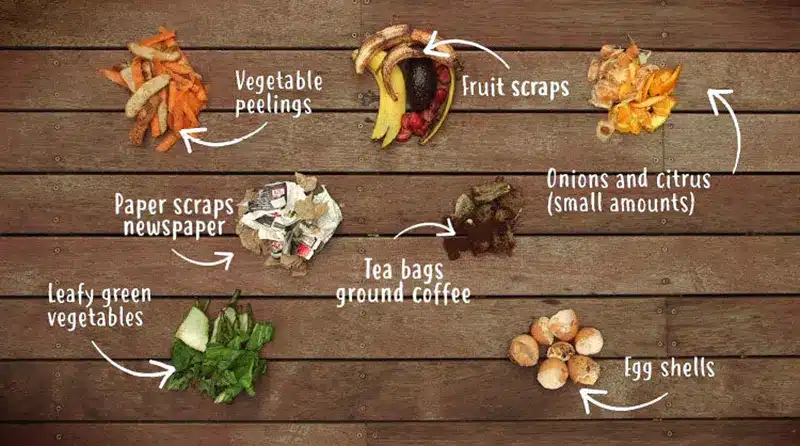
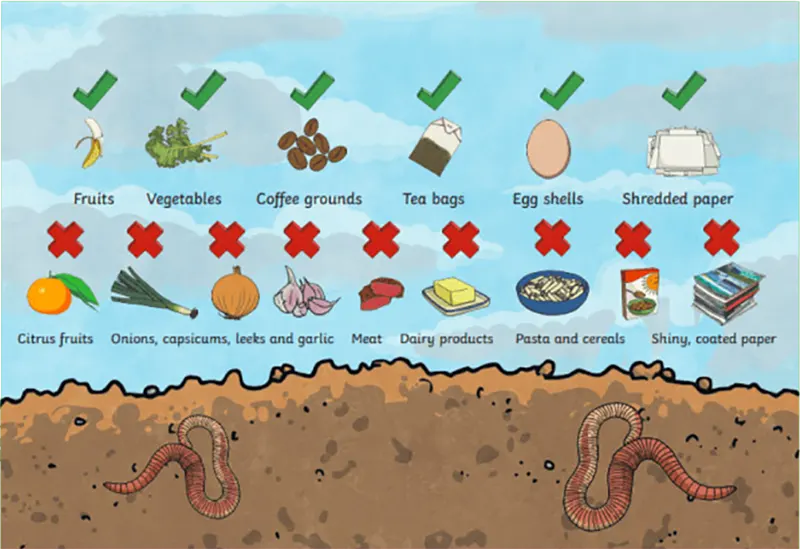
Worms can eat:
- Fruit and vegetable scraps
- Bread
- Cheese
- Rice and grains
- Pasta
- Cooked vegetables
- Vegetarian foods
- Egg shells
- Coffee grounds
- Tea bags made of paper
- Newspaper
- Egg cartons
- Dry leaves
- Non-glossy, soaked, and unprinted cardboard
Worms can eat with caution:
- Vacuum cleaner dust from carpets made only from natural fiber
- Small amounts of citrus fruits and onions
Worms Can’t Eat:
- Fish
- Meat
- Garden waste (slow to breakdown)
- Glossy or bleached paper (toxic)
- Fresh manure (can kill your worms)
What Is a Worm Farm Leachate?
Worm farm leachate is more commonly called liquid worm wee or worm pee. This is the liquid that you collect from the worm farm that you need for your garden. That is why a faucet or tap should be available at the bottom layer of your worm farm container.
A worm farm leachate is not technically a fertilizer or a worm casting. Instead, it acts more like a soil conditioner which aids in the improvement of the soil’s overall health. It contains minerals that are essential to the microorganisms present in the soil.
Worm farm leachate is more like a vitamin for the soil and plants. It is not their food. Since leachates are vitamins, they need to be diluted with water. It is best to dilute them with rainwater before applying them to the soil. The recommended ratio is 10:1, 1 part leachate and ten parts rainwater.
Given this, you should also collect and store rainwater. Rainwater is best used to dilute leachate for tap water is chlorinated. It can kill the good bacteria present in the leachate.
How Do You Collect and Use Worm Farm Leachate?
Collecting worm farm leachate is easy. Here are the basic steps on how to do it:
- Place a small bucket underneath the tap or faucet of your worm farm container to collect worm farm leachate. Once your bucket is full, you may turn off the tap.
- If your container doesn’t have a tap or faucet, make sure to provide a hose or pipe for the leachate. You may need to permanently position a bucket to collect the leachate. You also need to monitor your bucket in case it is full and needs to be replaced with an empty one.
Having a tap or faucet in your worm farm container can be very convenient. You can turn it off and save precious worm farm leachate when it rains heavily outside.
If it does rain, you need to use the collected leachate in the bucket right away. However, if it hasn’t rained for days, you may collect your leachate once a week.
What Are Worm Castings?
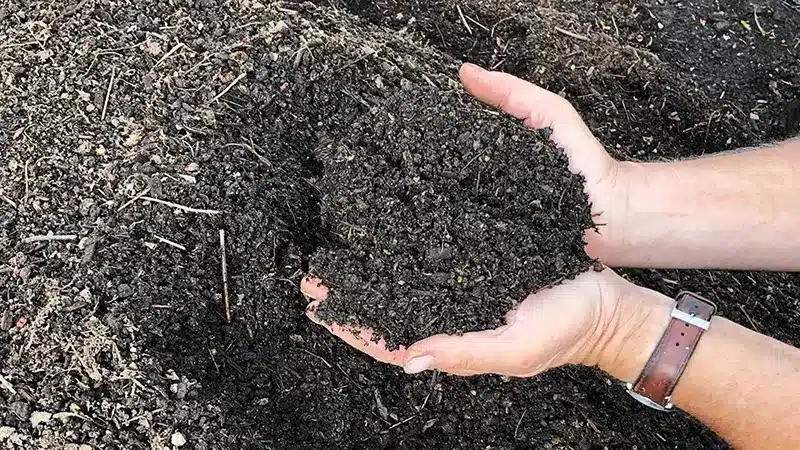
Worm castings are called vermicompost. This is the fertilizer you need for your garden. You know that your worm castings are ready when the food scraps are fully broken down and are well-blended with the bedding. The perfect worm casting looks rich, dark, fine, and moist.
How Do You Collect Worm Castings?
Collecting worm castings can be tricky because you need to separate the worms from the castings. You don’t want your compost worms to end up in your garden soil for they won’t survive there.
It is during the spring and autumn seasons that it is best to collect your worm castings. It is also during these seasons that your garden needs to be fertilized.
What Are the Techniques to Separate Worms From Worm Castings
As mentioned earlier, you want your compost worms to remain in the worm farm for they can’t survive outside of it. Given that, there are three different techniques on how to separate worms from the worm castings efficiently.
However, a simple reminder before you try any of the techniques below is to return any worm eggs or cocoons that you may see while separating the castings. Worm eggs are small, roughly 3mm. They are either yellow or amber in color and look like tiny lemons.
Once you have collected the castings, you should use them in your garden right away. If you set the castings aside for a long time, they will turn dry and lose their nutritional value.
Here are the three different techniques for separating the worms from the castings:
1. The Pyramid Technique
The pyramid technique is useful in separating the worms from the castings on a regular day. The pyramid technique is effective because worms don’t like light and they get easily sunburned when exposed to it.
You will be needing a pair of rubber gloves for this task. Here are the steps in doing the pyramid technique:
- Collect all the castings that you need. Position yourself in a shady corner outside your home.
- On a low and flat board, pile up a manageable amount of casting to form a pyramid shape.
- Since worms don’t like to be exposed to light, they will burrow downwards. You can gradually scoop out the castings from the top and place these in a bucket or whatever container you may have.
- Keep repeating steps 2-3 until you have an almost flat pile full of castings with worms.
- You can return them to the worm farm.
2. The Rainy Day Technique
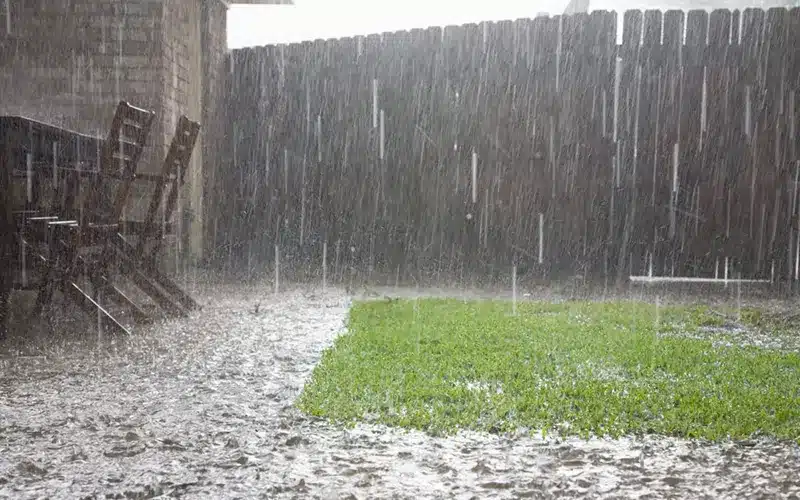
Worms are very sensitive to changes in their surroundings. They know when it will rain and they feel the changes in barometric pressure. Therefore, they instinctively move to higher ground to avoid drowning when it does rain.
This means, all the worms will move to the upper tray of your worm farm. This is the best time to remove the bottom tray from your worm farm leaving the top tray in the worm farm. Set aside the bottom tray somewhere that will keep it safe from the rain.
When the rain has passed, immediately use your worm castings in your garden. You may then return the tray to the worm farm.
If your worm farm doesn’t have layers or trays but has an opening at the bottom for collecting worm castings, you can place the castings in a bucket. When you do this, make sure not to let the castings stay in the bucket (without drainage) for very long. This can cause moisture build-up and produce stagnant water.
3. The ‘Let the Worms Decide’ Technique
Another technique that you may want to try to separate the worms from the castings is the ‘let the worms decide’ technique. Worms prefer to live in fresh bedding and fresh food. They would avoid staying in bedding that has turned into casting as much as possible.
Considering this natural instinct, you may push the worm castings to one side of the farm leaving an empty space to prepare fresh bedding with food.
All the worms will be attracted to the new setup and will move away from the castings. This is the perfect time to collect your castings. This technique is best applied in long and wide worm farms like an old bathtub.
How Do You Use Worm Castings?
The use of worm castings is similar to how you use organic fertilizers. Here are the several ways you can use worm castings:
Garden
You can simply dig a small hole in your garden and add the worm castings there. You may also add the castings under the mulch.
Sowing Seeds
You can add a maximum of 25% worm casting volume to your existing seed-raising medium.
Indoor Plants
Worm castings can be added to your indoor plants. When it is growing season, add a generous amount of casting to your potting mix.
Compost Activator
Worm castings are great to add to your compost mix. Adding the castings will introduce good bacteria to your compost.
Worm Casting Tea
Worm tea can be used to spray on the leaves of plants or can be added to water to be used in watering the soil.
What Are the Common Worm Farming Problems and How to Avoid Them?
Worms are generally low maintenance and they don’t have to be constantly looked after. However, taking care of and maintaining them is still very important. You should be aware of some problems that you may possibly encounter when doing worm farming.
Here are the common worm farming problems and solutions:
1. Protect Your Worm Farm From the Rain
Your worm farm will most certainly be subject to rain especially if it is placed outdoors. Some rainwater could enter your worm farm. The good thing about this is rainwater can help flush down leachate to the bottom tray.
However, if your worm farm has a tap and is constantly closed, the bottom tray may become flooded which could cause drowning for worms who may accidentally fall into the bottom layer. To remedy this situation, it is best to leave the tap open permanently and leave a bucket to collect the leachate.
2. Protect Your Worm Farm From Extreme Heat
The worm’s worst enemy is heat. It was mentioned that you have to position your worm farm in a shady area outside your home. Despite doing this, it is still possible that the worm farm can be exposed to direct sunlight at some point during the day.
The surrounding is hot and the temperature inside the enclosed worm farm will likely increase which can be very uncomfortable for your worms. To remedy this, you can open the lid of the worm farm a little to allow air circulation inside. You may use a stick or a piece of wood to support the small opening.
3. How to Deal With Insects
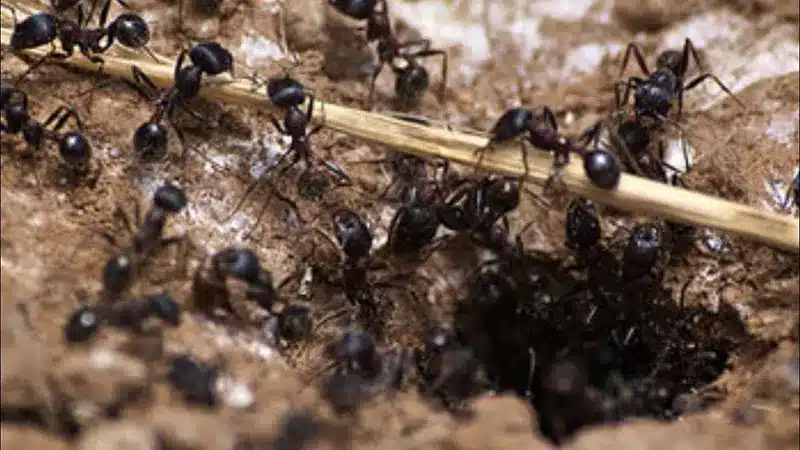
In a worm farm, creatures such as ants and vinegar flies are not welcome. Ants may find their way into your worm farm because of the food you placed inside. To stop inviting ants into your farm, dampen the worm farm with rainwater. Ants do not like moist and damp places.
Vinegar flies are also a no-no inside your worm farm. Vinegar flies are like fruit flies that you see when you open a compost bin or a trash can. These creatures are very much attracted to food. To avoid having them in your worm farm, make sure that you have a worm blanket to cover your worm bedding.
4. How to Deal With Bad Smell at the Worm Farm
A healthy worm farm should have no smell as much as possible or it could smell like the forest floor or healthy soil. If you can sense a vinegar smell coming from your worm farm, it is an indicator that it is acidic. You need to add eggshells, wood ash, or garden lime to help with the acidity.
If you notice a strong and foul smell, this means that the farm is anaerobic because there are several uneaten foods present. You should stop adding food in this scenario. You should add wood ash or garden lime into the mix. Aerate the food regularly by stirring the food lightly.
Summing it All Up!
A worm farm is a perfect way to convert your food wastes into usable fertilizer long term. It is also a great investment if you are looking into organic farming and being self-sustainable.
When you are in the kitchen, it is best to have a container with a lid solely for your food scrap or kitchen waste that will be fed to your worm farm.

If you are thinking of expanding your garden, you can look into the best crops to grow in shady areas. Or, if you are bothered by the weeds growing in your garden, you may want to start making a homemade weed killer. You will find these two articles useful for your garden.
Maintaining a worm farm is easy and manageable. You can definitely do it! With enough research, you can run your own worm farm at home. You will enjoy having a lifetime supply of both castings and leachate for your garden.


